About profiles in Cevoid
Cevoid maintains a complete record of each person in your workspace. A profile is not accessible by the person, but is instead there to help your team keep your brand community organized. This means that we create and maintain a single profile for each individual who interacts with your brand through a Cevoid solution. A profile will be created the first time an individual uploads a post, approves a rights request, opts into your program, or is manually added to the platform by your team.Change the Profiles overview columns
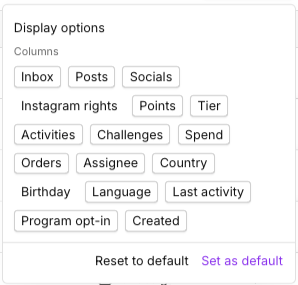
You can change the columns displayed in the profiles overview table and the Segments respective table.
- Navigate to the Profiles overview
- Click Columns
- Click on the columns you want to include or remove
- Click Set as default to save the view for your team
- Click Reset to default to go back to your workspace’s default columns
Access a profile in Cevoid
- Navigate to the Profiles overview
- Limit the Profiles table by:
- Use the search bar to enter a profile’s name, email address, or social media handle
- Use the filters to filter for data and attributes related to the profile
- Use the Segment tabs for profiles belonging to a dedicated segment
- Click on the profile’s name
Review the profile page
Each profile page contains five primary tabs and a list of information about the profile.Tabs on the profile page
- Content - All posts from the profile, no matter what status the posts have
- Instagram - Tagged and Mentioned Instagram posts from the profile that you’ve not requested yet
- Challenges - All submissions from this profile to your challenges
- Rewards - All rewards the profile has received from your program
- Activity - An activity log with all actions related to the profile
Profile properties and information
Profile properties and information are available in the sidebar on each profile page. Profile properties| Field | Description |
|---|---|
| Assignee | The user in your team to whom the profile has been assigned to |
| Labels | Any profile labels your team has added to this profile |
| Created | Any profile labels your team has added to this profile |
| Field | Description |
|---|---|
| Joined | The date they opted into your program |
| Tier | Their current tier |
| Balance | Their current points balance |
| Earned | The total amount of points they have earned |
| Spend | The total amount they have spent based on orders tracked by Cevoid |
| Orders | The total number of orders tracked by Cevoid related to the profile |
| Field | Description |
|---|---|
| Name | The name on this profile. This Value is used on UGC widgets and Program widgets |
| Their email adress | |
| City | Profile data that you can collect through your program |
| Language | Profile data that you can collect through your program |
| Birthdate | Profile data that you can collect through your program |
| Emails | Email preferences collected from the Profile |
| Ecommerce store sync (if integration) | If their data is automatically synced to your ecommerce store. Clicking the value shows what store they are connected to and allows you to trigger a manual sync. |
| CRM sync (if integration) | If their data is automatically synced to your CRM solution. Clicking the value shows what CRM account they are connected to and allows you to trigger a manual sync. |
| Field | Description |
|---|---|
| Username | The Instagram handle related to the profile |
| Rights | The current Instagram content rights setting for their mentioned and tagged posts |
Popular profile actions
Upload content to a profile
You can upload UGC directly to a profile if you’ve received content outside of Cevoid but want to use it in the platform.- Navigate to the individual’s profile
- Click Upload in the upper right corner and select the files
- Alternatively, drag and drop the content from a folder into the individual’s profile
Whitelist a profile’s Instagram handle
This action is recommended when you have already secured the rights, outside of Cevoid, to use all tagged and mentioned Instagram accounts from an individual (e.g., an influencer
- Navigate to the individual’s profile
- Change the Rights value under Instagram in the sidebar
- Send requests - Your team will need to send requests, or manually skip, for each post they have tagged or mentioned you in.
- Direct access to future posts - Cevoid will skip the request step and push newly detected tagged or mentioned Instagram posts to your Inbox.
- Direct access to historical and future posts - Cevoid will skip the request step and push already, and newly, detected tagged or mentioned Instagram posts to your Inbox.
Adjust the profile’s points balance
This action is only possible if the program module is included in your subscription
- Navigate to the individual’s profile
- Click on their Balance under _Program membership _in the sidebar
- Enter how many points should be added to their balance
- Use negative values (e.g., -100) to deduct points from their balance
- Optional: Enter a reason for the manual adjustment. This will be displayed alongside the adjustment in the activity log
- Click Adjust points
Delete a profile
Deleting a profile will permanently remove it from Cevoid and delete all associated posts and data. To delete a profile:
- Navigate to an individual’s profile.
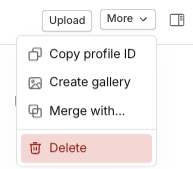
- Click More in the upper right corner
- Click Delete
- Click Delete in the confirmation pop-up
Merge two profiles
Merging two profiles will result in a single profile for the individual, and you will be able to select what data the merged profile should inherit. Posts from both profiles will remain on the merged profile. To merge two profiles:
- Navigate to one of the profiles
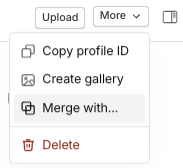
- Click More in the upper right corner
- Click Merge with
- Click Select a profile and select the member you want to merge with
- Click Next step
- Select values that should be used from either of the profiles
- Click Merge
- Click Merge in the confirmation pop-up
Assign a profile to a team member
You can internally assign profiles to users within your workspace, helping your team keep your brand community organized. This is a popular action if you are managing your influencers and ambassadors within Cevoid.- Navigate to the individual’s profile
- Click Unassigned under Properties in the sidebar
- Select a user from your team
