This article covers how our Shopify integration works with the UGC module. Please refer to the general Shopify integration article to learn how to activate the integration and explore additional integration elements that are not specific to the UGC module.
Implement UGC widgets on a Shopify store
Cevoid’s Shopify app for UGC allows you to easily implement UGC widgets on your Shopify store without needing to write a single line of code.Please refer to the general implementation guide if you run a headless storefront
Refer to these articles to learn how to create and design your UGC galleries and cards:
Add a gallery using sections
- Navigate to UGC -> On-site widgets
- Open the gallery you want to implement
- Click Embed gallery in the upper right corner
- Copy the Gallery ID
- Navigate to your Shopify theme and open the page you want to embed the gallery on
- Add a new section and search for Cevoid gallery
- Paste the gallery ID and adjust the copy
- Click Save
Add the product page gallery using sections
Add the product page gallery using sections
- Navigate to UGC -> On-site widgets
- Open the product page gallery you want to implement
- Click Embed gallery in the upper right corner
- Copy the Gallery ID
- Navigate to your Shopify theme and open the product page template
- Add a new section and search for product-page gallery
- Paste the gallery ID and adjust the copy
- Click Save
Add the product page gallery using sections
- Navigate to UGC -> On-site widgets
- Open the product page gallery you want to implement
- Click Embed gallery in the upper right corner
- Copy the Gallery ID
- Navigate to your Shopify theme and open the product page template
- Add a new section and search for product-page gallery
- Paste the gallery ID and adjust the copy
- Click Save
Add a card or gallery with a custom Liquid or HTML section
We recommend that you use Cevoid’s prebuilt sections to embed your galleries, but you also have the option to add them as code blocks.You will need to add Cevoid’s script to your theme file if you’re not using Cevoid’s section
How to add Cevoid's script to your theme file
How to add Cevoid's script to your theme file
- In Shopify, Click Online Store
- Click the three dots symbol (…) on the theme you want to edit
- Press Edit code
- Navigate to the theme.liquid file
- Paste the script code before the </head> tag
- Click Save
- Navigate to UGC -> On-site widgets
- Open the product page gallery you want to implement
- Click Embed gallery in the upper right corner
- Copy the Gallery div-code
- Navigate to your Shopify theme and open the page you want to embed the gallery on
- Add a new section and a custom liquid or HTML section
- Paste the gallery div-code
- Click Save
Localization of UGC widgets
All Cevoid widgets can be localized to align with each of your storefronts using Markets. The widgets will automatically detect what market they are displayed on and use the corresponding language and display product tags with the correct currency, price, and URLs.Products and variants
Product tags are an essential element when showcasing UGC since they help visitors navigate to the products featured in the posts they are inspired by. We will continuously sync your product catalog to ensure that you can easily add new product tags to posts and that the information displayed in your UGC widgets is up to date. When you add a product tag to a post, we will automatically connect the post to other variants of that product, the category, and any related collections. This way, you can build super relevant galleries around your products and utilize dynamic galleries such as the product page gallery.How to group products that are NOT variants in Shopify
How to group products that are NOT variants in Shopify
Variants for Shopify work great, but some merchants might want to have separate primary products for variants of color. For this setup, you will need to add a grouping tag in Shopify to be able to utilize the fallback behavior of the product page gallery fully.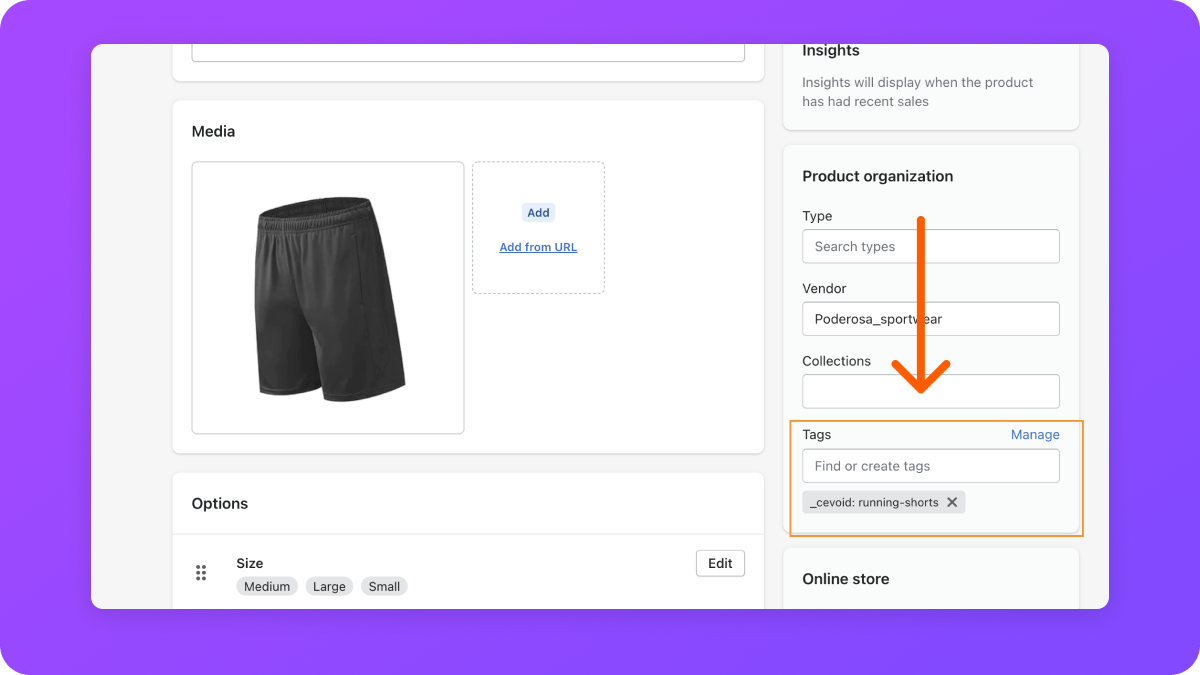
- In Shopify, navigate to the product
-
Add a tag prefixed with and a unique identifier after: _cevoid: customIdentifer
- _The tag could look something like this: _cevoid: running-shorts
- Add the exact same tag to all other products you want to group together. Products with the same cevoid tag will now share Images and Videos across the product page gallery.
Products can have multiple _cevoid: tags if you need to group products together in other ways as well. For example if you have a product that bundles together multiple products and sell as a bundle. You can use the same methodology.
Activate conversion tracking for Analytics
Cevoid’s UGC analytics don’t utilize any cookies except for when the conversion tracking is activated. Activating it allows you to see extra metrics, such as conversion rate on your UGC posts. Follow these steps to activate Cevoid’s conversion tracking in your Shopify stores:- Navigate to Analytics
- Click Implementation instructions (open by default the first time you visit the page)
- Click Enable for each of the Shopify stores you want to activate it on
- Copy the cookie information and add it to your cookie policy
- Select the currency you want to see reports in
- Click Enable