> ## Documentation Index
> Fetch the complete documentation index at: https://docs.cevoid.com/llms.txt
> Use this file to discover all available pages before exploring further.
# Upload forms
> Create upload forms to invite your community to share content directly with your brand.
Related articles:
[Platform uploads](/ugc/collect/platform-uploads), [Library & Inbox](/ugc/manage/library-and-inbox), [Posts](/ugc/manage/posts), [Galleries](/ugc/showcase/galleries), [Legal](/general/legal)
Upload forms enable your community to share content directly with your brand through a simple interface. Present upload forms in three ways: embedded as upload buttons within gallery widgets on your website, or shared externally through dedicated URLs and QR codes.
Navigate to [UGC -> Uploads](https://app.cevoid.com/uploads) to manage your upload forms.
| Specification | Limit |
| --------------------- | ------------------------------ |
| **Supported formats** | .jpeg, .webp, .png, .mov, .mp4 |
| **File size** | 200 MB per file |
| **Video length** | 10 minutes maximum |
| **Upload capacity** | Up to 5 files at once |
***
## How upload forms work
Upload forms provide a direct channel for your community to share content with your brand outside of social media platforms.
| Aspect | Description |
| ------------------------ | -------------------------------------------------------------------------------------------------------------------------------- |
| **Where to present** | Embedded in a [Gallery](/ugc/showcase/galleries), or shared via upload link or QR code |
| **What can be uploaded** | Up to 5 photos or videos per submission with optional captions |
| **Built-in consent** | Usage rights step included if you have a content consent policy under [Settings -> Legal](https://app.cevoid.com/settings/legal) |
| **Where posts appear** | All uploaded posts appear in [UGC -> Inbox](https://app.cevoid.com/inbox) for review |
Learn how to set up a content policy in [Legal settings](/general/legal).
***
## Create an upload form
1. Navigate to [UGC -> Uploads](https://app.cevoid.com/uploads)
2. Click **New folder**
3. Enter a name for your form (for internal organization)
***
## Embed an upload button in a gallery
Add upload functionality directly to your website galleries for seamless content collection.
 Uploaded posts still need to be approved by your team before going live on your website.
1. Navigate to [UGC -> On-site widgets](https://app.cevoid.com/galleries)
2. Open the gallery you want to add upload functionality to
3. Click **Design** to access gallery settings
4. Enable ***Upload button***
5. Select the upload form to use
6. Click **Save changes**
When enabled, visitors can click the upload button in your gallery to contribute content using a popup version of your upload form.
***
## Share a link to your upload form
Each upload form generates a unique link and QR code that you can share across marketing channels.
* **Upload link:** Perfect for email campaigns, social media stories, and collecting content that influencers did not post on social media
* **QR code:** Perfect for packaging, print material, event material, and in-store displays
***
### Using the upload link
1. Navigate to [UGC -> Uploads](https://app.cevoid.com/uploads)
2. Select the upload form you want to share
3. Click **Share** to access the upload link
4. Copy the URL
***
### Using QR codes
1. Navigate to [UGC -> Uploads](https://app.cevoid.com/uploads)
2. Select the upload form you want to share
3. Click **Share** to access the upload link
4. Download the QR code
***
## Localization
Upload form copy can be translated under [Settings -> Translations](/general/translations).
On-site widgets determine what language to display based on your [Markets](/general/products-markets). This is also reflected in upload forms embedded in a gallery.
Upload links can include a language parameter to use the same upload form for multiple languages. For example, `https://upload.cevoid.com/poderosa-world?language=de` displays the upload form in German.
***
## Customer experience
This is what customers see when they use your upload form.
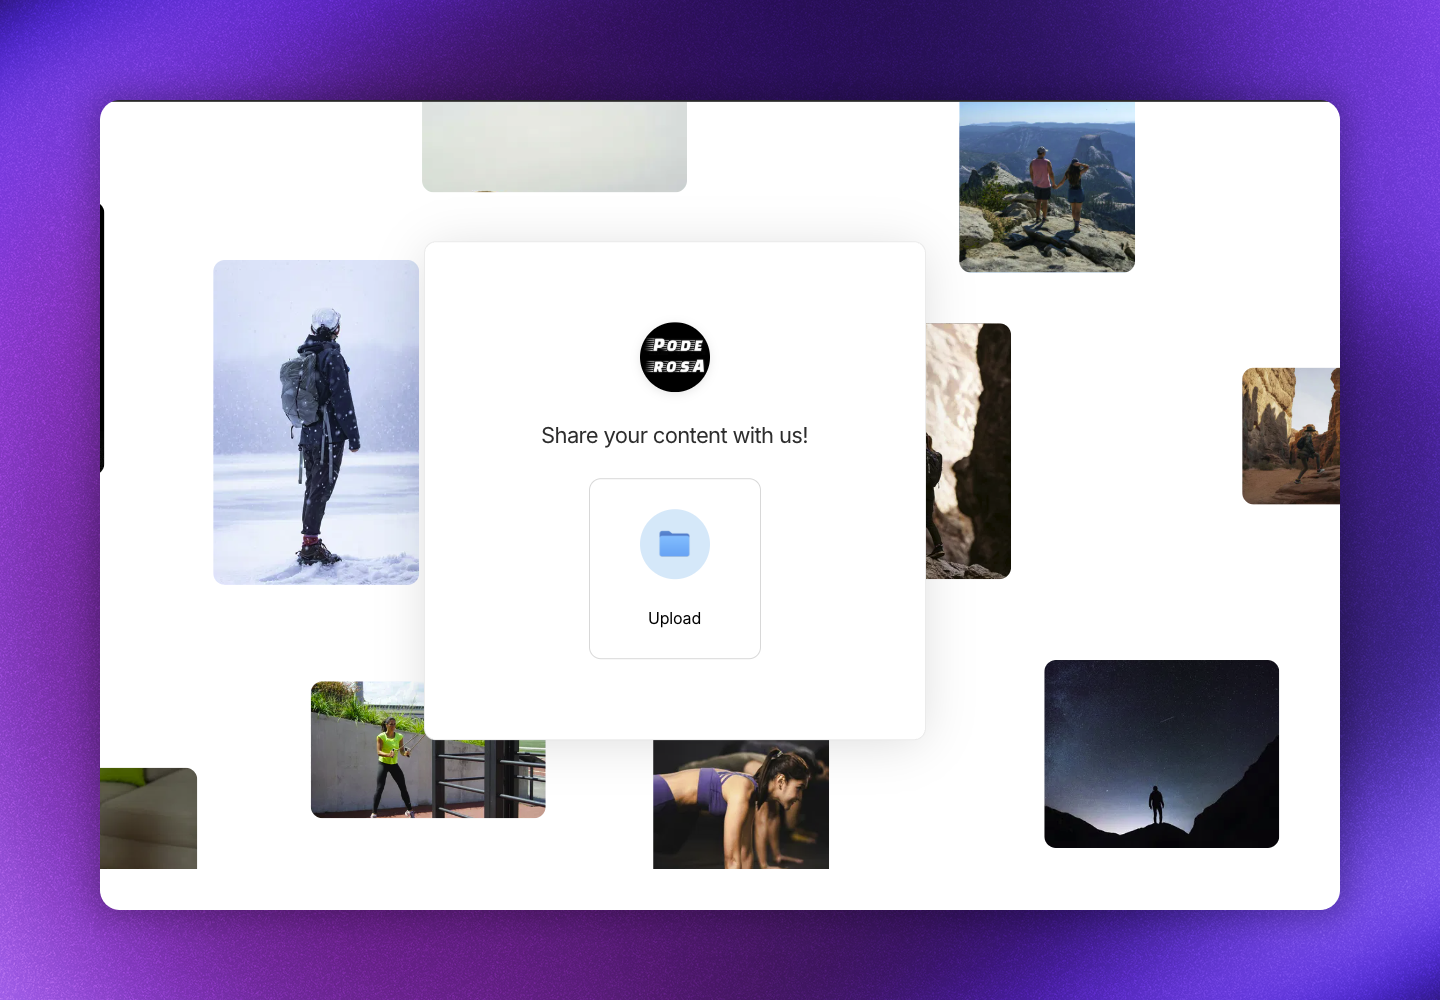
**Step 1:** Customer is presented with the upload form and clicks **Upload** to select photos and videos from their device.
Uploaded posts still need to be approved by your team before going live on your website.
1. Navigate to [UGC -> On-site widgets](https://app.cevoid.com/galleries)
2. Open the gallery you want to add upload functionality to
3. Click **Design** to access gallery settings
4. Enable ***Upload button***
5. Select the upload form to use
6. Click **Save changes**
When enabled, visitors can click the upload button in your gallery to contribute content using a popup version of your upload form.
***
## Share a link to your upload form
Each upload form generates a unique link and QR code that you can share across marketing channels.
* **Upload link:** Perfect for email campaigns, social media stories, and collecting content that influencers did not post on social media
* **QR code:** Perfect for packaging, print material, event material, and in-store displays
***
### Using the upload link
1. Navigate to [UGC -> Uploads](https://app.cevoid.com/uploads)
2. Select the upload form you want to share
3. Click **Share** to access the upload link
4. Copy the URL
***
### Using QR codes
1. Navigate to [UGC -> Uploads](https://app.cevoid.com/uploads)
2. Select the upload form you want to share
3. Click **Share** to access the upload link
4. Download the QR code
***
## Localization
Upload form copy can be translated under [Settings -> Translations](/general/translations).
On-site widgets determine what language to display based on your [Markets](/general/products-markets). This is also reflected in upload forms embedded in a gallery.
Upload links can include a language parameter to use the same upload form for multiple languages. For example, `https://upload.cevoid.com/poderosa-world?language=de` displays the upload form in German.
***
## Customer experience
This is what customers see when they use your upload form.
**Step 1:** Customer is presented with the upload form and clicks **Upload** to select photos and videos from their device.
 **Step 2:** Customer can enter a caption for their post(s).
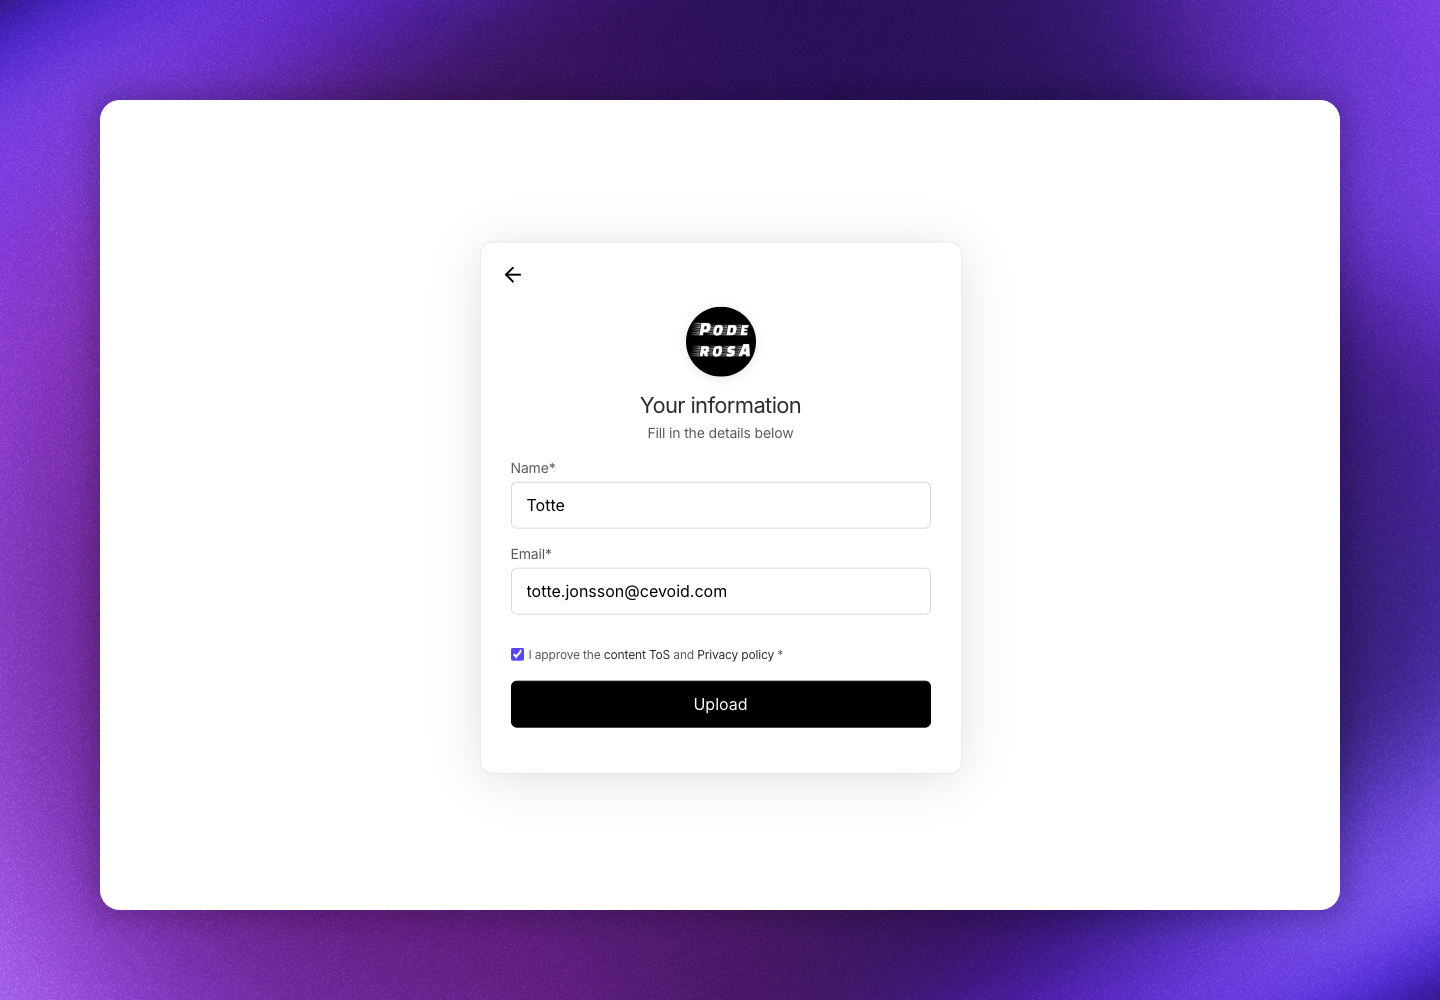
 **Step 3:** Customer enters their name and email address and accepts your content consent policy. The post is saved to the profile that matches their email, or a new profile is created.
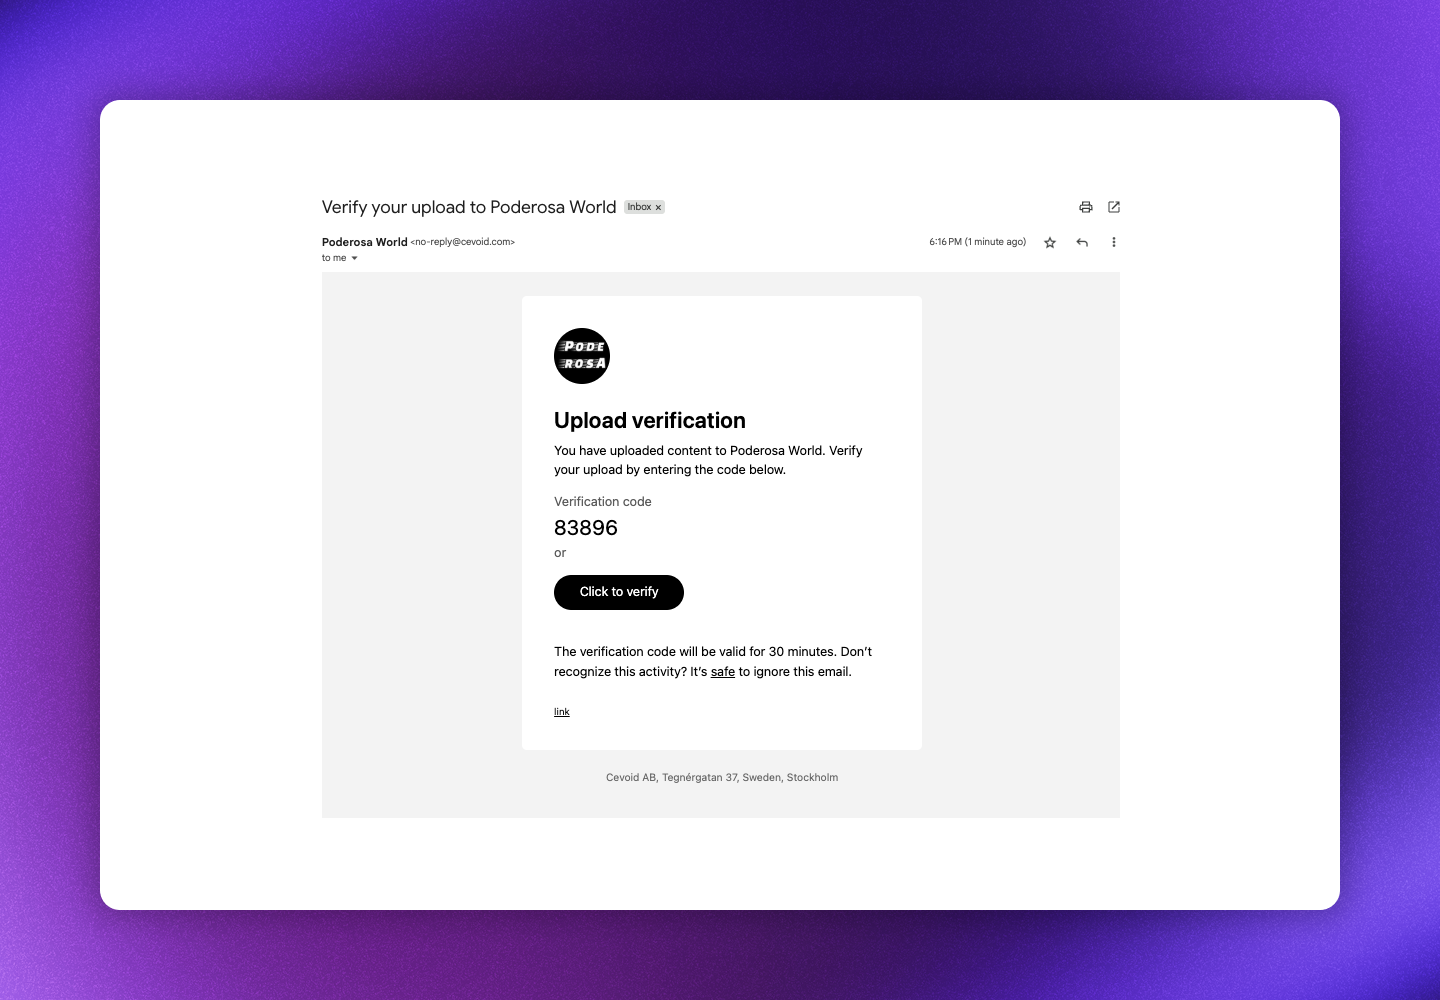
 **Step 4:** They receive an email to verify that they uploaded the post.
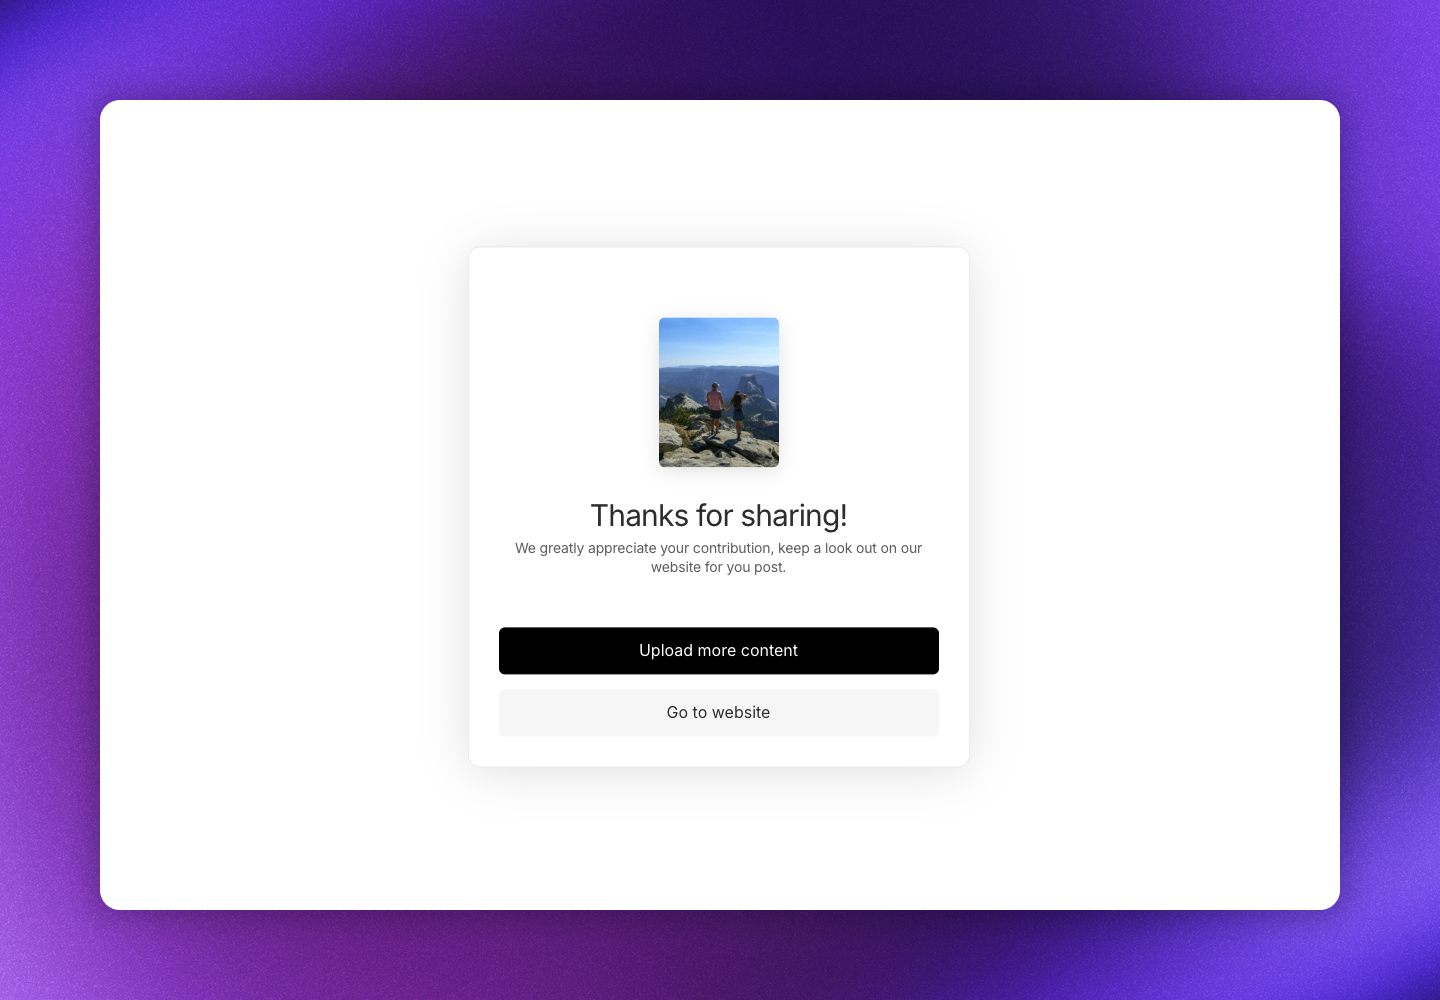
 **Step 5:** The upload is completed and the post is pushed to your Inbox. They can upload more or navigate to your website.